Connect with us

Cellulite

Home Remedies For Ringworms – Know Before You Go!

Published

on

Home remedies for Ringworms

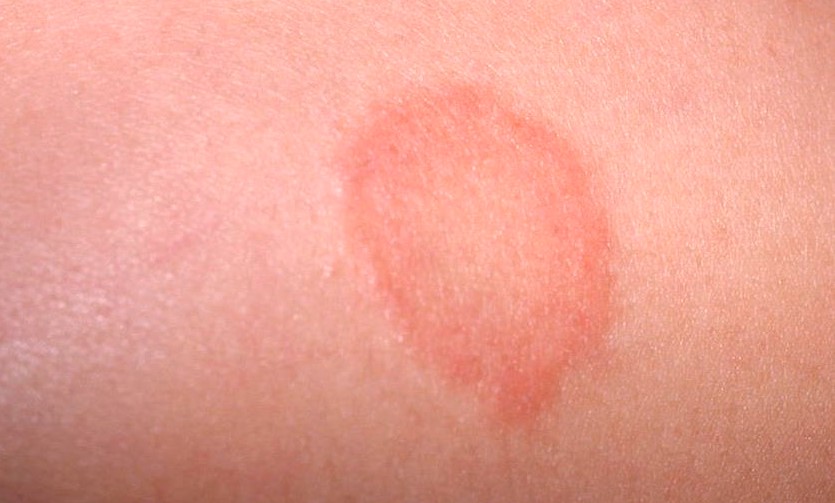
First thing, what the name suggests, ringworm is not a worm. It is a kind of skin condition caused by a fungus known as tinea. This fungus is found or lives on the dead tissues of your skin, hair, and nails.

Ringworm is something that causes your skin to develop circular, red, scaly, and itchy rashes. And, it badly affects the scalp, legs, toenails, and fingernails. People who share locker rooms or swimming pools or have pets stand are often prone to the infection. Experts say, this infection is contagious and can easily spread from person to person. Hence, it is important to treat such rashes and also keep the infection under control.

Give a read to this content, we will share a few natural remedies to treat the symptoms. 

Natural Remedies To Get Rid Of Ringworms:

Apple Cider Vinegar:

Apple cider vinegar contains antifungal properties that may help in combating the infection-causing fungus and even aid recovery from the infection.

The Things You Will Need:

  • 1 teaspoon of apple cider vinegar
  • Sterile cotton ball

What You Have To Do:

  • You just have to dilute a teaspoon of apple cider vinegar using some water.
  • Very next, you ought to soak a cotton ball in the solution and apply it to the affected area.
  • Then, you have to keep the cotton in place using a band-aid.
  • You have to do this about 3-4 times a day for a week.

Tea Tree Oil:

Tea tree oil is fully loaded with bioactive compounds that possess antifungal properties. It is well-known for treating tine pedis. Hence, it may also assist in treating the symptoms of ringworm.

The Things You Will Need:

  • A few drops of tea tree oil
  • Sterile cotton pad

What You Have To Do:

  • First, there is a need to dilute tea tree oil with a carrier oil like sweet almond oil or jojoba oil.
  • Then, you have to dab a cotton ball with the oil blend and apply it to the affected area.
  • Very next, you ought to repeat this a few times during the day for 7-10 days.

Coconut Oil:

Coconut oil consists of antifungal properties that can help in treating fungal infections like Candida. Also, it contains emollient properties that may also soothe the irritation and itching that often accompanies ringworm.

The Things You Will Need:

  • Virgin coconut oil

What You Have To Do:

  • You have to take some coconut oil on your fingertips
  • Then, there is a need to massage it gently over the affected area and leave it on.
  • You have to apply this oil 3-4 times a day until it heals.

Garlic:

Garlic is well-known because of its bioactive compounds like allicin that can be used for treating ringworm. The compounds exhibit antifungal properties that can assist in soothe the infection and heal it.

The Things You Will Need:

  • 3-4 cloves of garlic

What You Have To Do:

  • You have to crush the cloves of garlic and rub the paste over the infected area.
  • Very next, there is a need to leave it on for 10-15 minutes before washing it off.
  • You have to do this daily until the rash disappears.

Oregano Oil:

Oregano oil exhibits antifungal activity that can help in getting rid of the infection-causing fungi and even helps to treat the symptoms.

The Things For Oregano Oil:

  • 2-3 drops of oregano oil
  • Carrier oil

What To Do:

  • First of all, you ought to dilute a few drops of oregano oil with a carrier oil.
  • Very next, you ought to apply this mixture to the affected area and leave it on.
  • You should have to do this at least once a day until it is healed.

Eucalyptus Essential Oil:

Eucalyptus essential oil exhibits fungistatic effects that well-known for treating fungus. Its topical application may assist to treat the infection and even soothe the affected area.

The Things You Will Need:

  • 2-3 drops of eucalyptus oil
  • Water

What You Have To Do:

  • First, you have to take a few drops of eucalyptus oil and dilute with the water.
  • Very next, you have to dab the gauze in this solution and secure it on the affected area using a band-aid.
  • Finally, you have to leave this on overnight.
  • You have to repeat it every night until the affected area is healed.

Lavender Essential Oil:

Lavender essential oil fully packed with antifungal properties. Hence, this essential oil can prove to be an effective option to treat ringworm and even helps to stop it from spreading.

The Things You Will Need:

  • 3-4 drops of lavender essential oil
  • Carrier oil

What You Have To Do:

  • First of all, there is a need to take a few drops of lavender oil and dilute it with a carrier oil.
  • Very next, you ought to dab it on a cotton ball and apply it to the affected area.
  • You have to do this at least two times a day to get rid of ringworms

Neem Oil:

The topical application of neem oil can help to get rid of ringworm. Neem oil is fully packed with phytochemicals that exhibit fungicidal properties.

The Things You Will Need:

  • A few drops of neem oil

What You Have To Do:

  • First, you have to dab a few drops of neem oil on a cotton pad and apply it to the affected area.
  • You should have to apply this oil two times a day for about 7-10 days.

Turmeric:

According to experts, turmeric exhibits antifungal properties against different strains of dermatophytes. This can help combat the symptoms of ringworm infection and also prevent further infection.

The Things You Will Need:

  • ½ to 1 teaspoon of turmeric powder
  • A few drops of water

What You Have To Do:

  • You have to mix turmeric powder with some water to make a thick paste.
  • Very next, you have to apply this paste over the rash and leave it on for 15 minutes.
  • Then, there is a need to wash thoroughly with water.
  • You have to apply turmeric paste twice a day.

Continue Reading
Click to comment

Leave a Reply

Your email address will not be published. Required fields are marked *

Cellulite

Get Rid Of Flabby Arms With These Exercises

Published

on

Get Rid Of Flabby Arms

Flabby arms are something that looks as bad being a jiggly tummy. They make you look unfit, older, and also on top of this sleeveless clothes are simply embracing! In reality, arms may ruin your appearance in the parties even with your perfect body. No doubt, this will impact your confidence and generate a bad body image.

We all said and done, how exactly do we get rid of flabby arms? And what can cause them? Read to learn!

What Causes Flabby Arms?

Flabby arms are caused due to two reasons. One, when our skin one tends to lose its elasticity as we age and second because of fat accumulation. So, if you are someone who prone to such look and want to look perfect with toned arms, then you should have to get rid of those unsightly flabby arms. So, you have to stick on working on your biceps and triceps to get instant results. In this article, we are decided to mention some best arm exercises that will help to shed the extra arm fat and even build lean muscle. So, there is no need to waste any more time, let’s begin with the following exercises!

Exercises For Flabby Arms:

What You Have To Do:

Triceps Dips:

  • You have to assume the starting position by placing both arms behind your back, and there is a need to gripping a bench or the rack.
  • Then, from the starting position, there is a need to slowly lower yourself, and keep your body upright and your elbows, and then tucked close to your sides.
  • Very next, you ought to concentrate on lowering your body only using your triceps. And, you have to make sure that your elbows are at a 90-degree angle.
  • Right after, there is a need to push your body back up using only your triceps. Repeat.

Push-Ups:

  • First, you have to place your hands with the palms facing down on the ground, and keep your shoulder-width apart, with a slight bend in both arms. Keep your feet together. You have to support your weight on your hands and toes.
  • Very next, you ought to lower yourself until your chest is almost touching the ground. You have to inhale as you do this.
  • Right after, exhale and push your body up back to the starting position.
  • Finally, you ought to keep steady yourself at the top and repeat.

Tricep Kickbacks:

  • Fist, you have to hold a dumbbell in each hand.
  • Then, while you are standing, you ought to bend your knees slightly, and there is a need to keeping your back straight and bend forward slightly. Make sure that your body should be almost parallel to the ground.
  • Very next, you have to keep your head up and your arms close to your sides like that there is a 90-degree angle between your both forearm and upper arm.
  • Right after, there is a need to keep your shoulders locked to your sides while extending your both arms back. Then, you have to focus on the contraction of your triceps only.
  • Finally, you ought to hold for 2 seconds and lower your both arms to the initial position. Don’t try to swing your arms.
  • Repeat.

Tricep Extensions:

  • Well, you need to stand with your feet shoulder-width apart.
  • Then, there is a need to hold a dumbbell with both hands, make your thumbs wrapped around it for better grip. Make sure that the dumbbell should be held behind your head, and your palms should face the ceiling.
  • Then, you have to keep your upper arms close to your head. And, your elbows should be close to your eyes and perpendicular to the ground.
  • Very next, there is a need to lower your upper arms until the weight is touching the upper part of your back. And, avoid moving both elbows, and Keep them locked close to your ears.
  • Finally, you have to use your triceps to raise the dumbbell up using your both arms fully extended over your head. You have to exhale as you do this.

Bent-Over Row:

  • First, there is a need to stand with your feet shoulder-width apart and right after you ought to grab a barbell with your palms facing down.
  • Very next, you ought to bend forward and slightly bend both knees. Then, there is a need to keep your back straight. And, make sure that your torso should be parallel to the ground, and your head pointed up.
  • Then, you have to keep your elbows close to your body. Then, you ought to breathe out, and pull the bar towards your chest, just below your ribs. Then, you ought to exhale as you do this.
  • At this position, you have to squeeze your back muscles and hold.
  • Finally, you have to lower the bar down to the starting position, and you have to just around your knees. Repeat.

Arm Stretches:

  • First, you have to raise your hands above your head.
  • Very next, you have to hold your right wrist with your left hand and your left wrist with your right hand; thereby you have to interlock your hands.
  • Very next, with your right hand, you ought to pull your left hand towards your right such that your left elbow falls behind your head.
  • Then, you ought to release the tension and then take your arms back to the center without releasing your wrists.
  • Then, use your left hand; pull your right hand towards the left in such a way that your right elbow falls behind your head.
  • Again, you have to release the pull and take your hands to the center. Then, there is a need to repeat this for at least two sets of 20 repetitions each.

Continue Reading

Cellulite

Exercises For Strengthening The Groin Muscles

Published

on

Exercises For Strengthening The Groin Muscles

No doubt, your legs, especially the thighs and groin areas bear a lot of o abuse when exercising throughout the day. The inner thighs and groin are something that supported by muscles that run from just above the knees to the pelvic bone. These muscles are work as natural assistance in activities like involve jumps, kicks, and forward, backward, and even side to side movements. That’s the reason why there is a need to have strong and flexible groin muscles to prevent injuries during a workout or even day-to-day movements. 

Well, here we are going to elaborate on a few best exercises for strengthening the groin muscles. Read on!

Exercises For Groin Muscles:

Adductor Squeeze:

Steps You Have to Do:

  • At the start, you just have to lie down on your back on a mat. For instance, you have to place your hands along the sides of your body.
  • Now, you ought to keep your knees pointing upwards and then there is a need to grab a softball in between them.
  • Right after, you have to slightly squeeze the ball to tighten your adductor muscles.
  • Very next, you have to pause for a few seconds and repeat it 8-10 times.
  • Sets And Reps – 3 sets of 12 reps

Side-Lying Groin Stretch:

Steps You Have to Do:

  • First of all, you have to lie down on your left side.
  • Then, you have to support your head with your left hand while keeping your legs straight.
  • Very next, you have to slowly lift your right leg in the air as much as possible.
  • Now, here you can also support your knee with your right hand.
  • You have to hold on to this position to feel the stretch.
  • Finally, you have to repeat it with the other leg by changing your side.
  • Sets And Reps – 3 sets of 12 reps

Lunges:

Steps You Have to Do:

  • First of all, you have to stand straight with your hands positioned on your sides and place your right foot in front of you.
  • Then, there is a need to slowly bend the right knee while keeping your back straight.
  • Now, you ought to keep bending it until your right leg is at an angle of 90 degrees with the ground. Also, bend your back leg during this process.
  • Very next, you ought to hold this position for a few seconds until you feel the stretch in your groin muscles. Then, you have to return to your normal position.
  • You have to repeat the same with the other leg.
  • Sets And Reps – 3 sets of 10 reps

Side Leg Raise:

Steps You Have to Do:

  • First, you have to stand next to a chair.
  • Then, you have to hold the chair with your right hand, then there is a need to place your right leg firmly on the ground and then you have to raise the left leg slowly in the air until you feel the stretch in your groin muscles.
  • Now, there you have to swing it back and cross it over your right leg. You have to repeat this 8-10 times.
  • Then, you have to change your side and do this exercise using the other leg.
  • Sets And Reps – 3 sets of 15 reps

Power Squats:

Steps You Have to Do:

  • First, you have to stand with your hands placed on the front of your thighs, and near your groin.
  • Then, there is a need to place your feet wide apart so that your toes are pointing outwards on either side.
  • Now, you have to bend your knees slowly and push your hips out. There is a need to keep your weight on your heels and raise your hands straight in front of you. And, here your palms should be facing down.
  • Then, you have to hold for a moment and come back to your starting position by pushing your heels to straighten your legs.
  • Very next, you may also do this exercise with weights in your hands to increase the intensity of the workout.
  • Sets And Reps – 3 sets of 10 reps

Gravity Groin Exercise:

Steps You Have to Do:

  • At the start, you just have to lie down on your left and keep a chair near your feet.
  • Then, you have to place your right leg on the chair while resting your left leg on the ground.
  • Now, you ought to raise the lower leg towards the bottom of the chair against gravity.
  • You have to hold for 8 to 10 seconds and return your leg to the ground.
  • Now, you have to switch to the other side and repeat the exercise using the other leg.
  • Sets And Reps – 3 sets of 12 reps

Groin Stretch:

Steps You Have to Do:

  • At the start, there is a need to sit on a mat and bend both knees so that your heels are close to your body.
  • Very next, you have to keep your back erect and lower your knees so that they touch the ground.
  • Now, you can also bend your back a little bit and even you can use your elbow to put pressure on the knees in a downward direction.
  • Right after, you have to release the tension slowly and repeat it a few more times to strengthen the groin muscles.
  • Sets And Reps – 3 sets of 15 reps

Hip Extension:

Steps You Have to Do:

  • First, you have to kneel down on the ground using your palms flat on the ground for support.
  • Then, you have to keep one leg firm, and then lift the other leg in the air as much as you can.
  • Very next, you have to bring it back to its starting position and, again, raise it in the air. You have to do this at least 10 times.
  • There is a need to repeat the exercise with the other leg.
  • Sets And Reps – 3 sets of 10 reps

Continue Reading

Trending